
🔴 Low OD Defect — To-the-Point Action Plan
Your Inline OD Sensor screen suddenly shows OD 2.0 against a target of 2.3. Speed is good, recipe is loaded, but the coating is too thin. What do you do — panic, stop the machine, or follow a systematic 5-step plan that fixes 80% of cases in under 5 minutes?
This blog gives you the exact field-tested action plan used on Met-1 and Met-2 lines. No theory, no fluff — just the steps that work.
⚡ Why Low OD Hurts Your Plant
- Customer rejection: Below-spec OD = barrier failure = entire jumbo becomes B-Grade or Reject
- Wasted aluminium wire: If you over-correct, you swing into High OD waste
- Lost production: Every minute of bare/low-OD film is lost meters from monthly target
- Re-work cost: Slitting team has to remove bad portions, eating into rewinder capacity
🎯 The 5-Step Action Plan
| Step | Action | Time | Tools Needed |
|---|---|---|---|
| 1. Confirm | Check OD reading vs target on sensor | 30 sec | HMI screen |
| 2. Wire Feed Check | Spool, jam, groove, springs | 1 min | Torch, gloves |
| 3. Boats Check | Glow uniformity, contacts, current | 1 min | Viewing window |
| 4. Sensor Check | Mode (Auto?), cleanliness, calibration | 1 min | IPA + lint-free cloth |
| 5. Verify | Run at 200 m/min, measure L/C/R | 2 min | Offline densitometer |

🔍 Step 1 — CONFIRM (30 seconds)
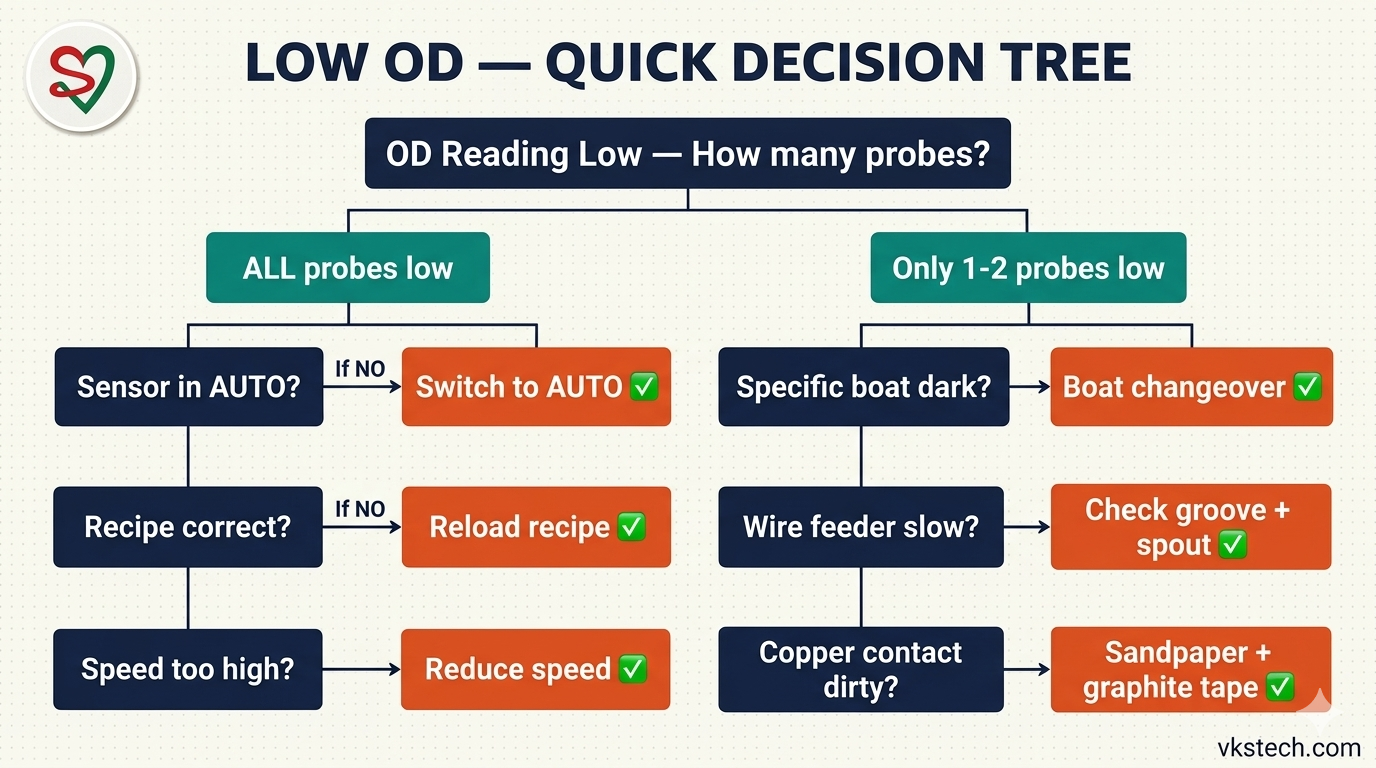
Before touching anything, look at the sensor screen carefully:
- All probes low? → System-wide issue (recipe, speed, sensor calibration)
- Only 1–2 probes low? → Specific boat or wire feeder problem
- Reading drifting slowly? → Boat aging or wire spool ending
- Reading dropped suddenly? → Boat crack or wire jam
This 30-second observation tells you which step to focus on next. Don't skip it.
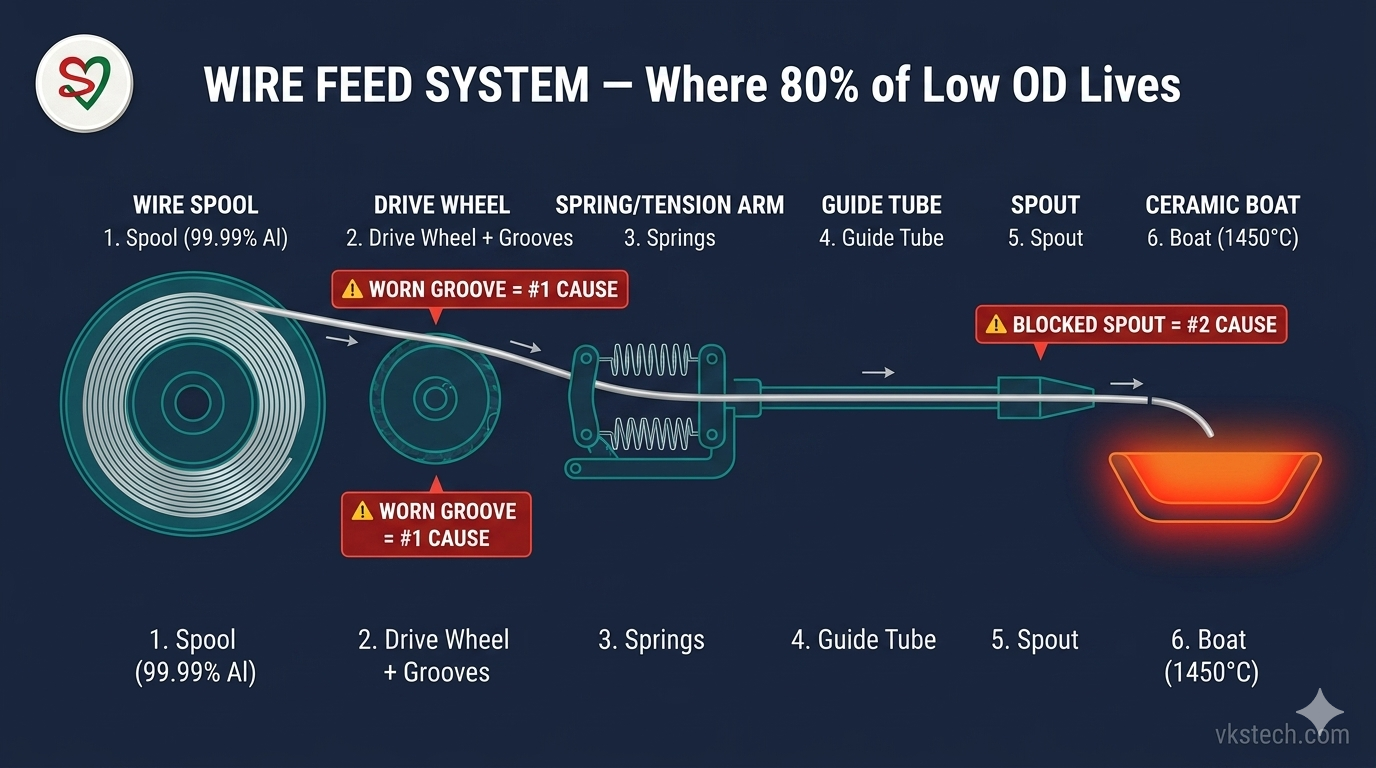
🔧 Step 2 — WIRE FEED CHECK (80% of cases live here!)
This is the single most important step. In real shop floor experience, 4 out of 5 Low OD cases are caused by something in the wire feed chain. Check in this order:
| Check | Symptom | Fix |
|---|---|---|
| Wire spool | Spool empty or near-end | Load new spool, splice properly |
| Wire jam | Wire stuck in spout / guide tube | Remove spout, clear blockage |
| Drive wheel groove | Worn groove → wire slips | Turn to 2nd groove (monthly PM) |
| Springs | Weak grip → inconsistent feed | Replace springs (kept in spare) |
| Spout alignment | Wire missing boat target | Reposition spout |
🔥 Step 3 — BOATS CHECK (1 minute)
Look through the viewing window during run (with proper PPE — UV-rated goggles):
- Dark or cold boat? → Crack confirmed → Plan boat changeover
- Uneven glow across boats? → Copper contact oxidation → Sandpaper + graphite tape during next stop
- Thyristor controller current below 500A? → Check setpoint, check LED status on power controller
- One end glowing, other end dim? → Clamp pressure uneven → Tighten evenly
📡 Step 4 — INLINE OD SENSOR CHECK
The sensor itself can be the source of the problem:
- Mode in Manual or Standby? → Switch to AUTO mode (most common operator miss after lunch break)
- Wire feed at 100% already? → System is starved → Reduce line speed temporarily
- Sensor window dirty? → Wipe gently with IPA + lint-free cloth (machine stopped only)
- Inline reading vs offline mismatch? → Recalibrate against densitometer reference
✅ Step 5 — VERIFY
Don't ramp back to full speed immediately. Verify like this:
- Run at 200 m/min (safe verification speed)
- Take an offline sample after 50 metres
- Measure OD at Left, Centre, Right on densitometer
- All three within ±0.1 of target? → Ramp speed in 50 m/min steps
- Still low? → Go back to Step 2 (something missed)
📊 Quick Reference — Top 5 Causes Ranked
| Rank | Cause | Frequency | First Action |
|---|---|---|---|
| #1 | Worn drive wheel groove | ~35% | Turn to 2nd groove |
| #2 | Blocked / damaged spout | ~25% | Remove and clean |
| #3 | Sensor stuck in Manual mode | ~15% | Switch to AUTO |
| #4 | Boat crack / cold spot | ~12% | Plan changeover |
| #5 | Wire spool ending | ~8% | Load fresh spool |
🛡️ Prevention — Stop Low OD Before It Starts
- Monthly PM: Turn drive wheel to next groove, replace worn spouts, check spring tension
- Weekly PM: Clean copper contacts, apply fresh graphite tape
- Per shift: Wipe sensor window during changeover
- Spare stock: Always keep 10–20 ceramic boats, springs, spouts ready
- Operator training: Make every operator practise the 5-step plan during slow shifts
📥 Free Downloads — Take This to the Shop Floor
Two professionally designed PDFs for immediate plant use. Print, laminate, and use during real defects:
🔴 Low OD Defect — सीधा-साफ Action Plan
आपकी Inline OD Sensor screen पर अचानक OD 2.0 दिख रहा है, target है 2.3। Speed सही है, recipe loaded है, पर coating पतली आ रही है। अब क्या करें — घबराएं, machine बंद करें, या एक systematic 5-step plan follow करें जो 80% cases को 5 मिनट में fix कर देता है?
यह blog आपको exact field-tested action plan देता है जो Met-1 और Met-2 lines पर रोज़ इस्तेमाल होता है। Theory नहीं, सिर्फ़ काम करने वाले steps।
⚡ Low OD आपके Plant को क्यों नुकसान देता है
- Customer rejection: Below-spec OD = barrier fail = पूरा jumbo B-Grade या Reject
- Aluminium wire बर्बाद: ज़्यादा correct करोगे तो High OD में चला जाएगा
- Production loss: हर minute का bare/low-OD film monthly target से कम meter
- Re-work cost: Slitting team को bad portions निकालने पड़ते हैं, rewinder capacity कम
🎯 5-Step Action Plan
| Step | Action | Time | ज़रूरी Tools |
|---|---|---|---|
| 1. Confirm | Sensor पर OD reading vs target check | 30 sec | HMI screen |
| 2. Wire Feed Check | Spool, jam, groove, springs | 1 min | Torch, gloves |
| 3. Boats Check | Glow uniformity, contacts, current | 1 min | Viewing window |
| 4. Sensor Check | Mode (Auto?), सफाई, calibration | 1 min | IPA + lint-free cloth |
| 5. Verify | 200 m/min पर चलाओ, L/C/R measure | 2 min | Offline densitometer |
🔍 Step 1 — CONFIRM (30 सेकंड)
कुछ भी छूने से पहले sensor screen ध्यान से देखो:
- सभी probes low? → System-wide issue (recipe, speed, sensor calibration)
- सिर्फ़ 1–2 probes low? → Specific boat या wire feeder problem
- Reading धीरे-धीरे drift? → Boat aging या wire spool ख़त्म हो रहा
- Reading अचानक गिरा? → Boat crack या wire jam
यह 30-second observation आपको बताती है कि अगला step कौनसा focus करना है। इसे skip मत करो।
🔧 Step 2 — WIRE FEED CHECK (80% cases यहीं हैं!)
यह सबसे important step है। Real shop floor experience में, 5 में से 4 Low OD cases wire feed chain में कुछ problem से होते हैं। इस order में check करो:
| Check | Symptom | Fix |
|---|---|---|
| Wire spool | Spool ख़ाली या ख़त्म होने वाला | नया spool लगाओ, सही splice |
| Wire jam | Wire spout/guide tube में फंसा | Spout निकालो, blockage clear करो |
| Drive wheel groove | Groove घिस गया → wire slip | 2nd groove पर turn (monthly PM) |
| Springs | Grip कमज़ोर → feed inconsistent | Springs बदलो (spare में रखो) |
| Spout alignment | Wire boat पर सही जगह नहीं | Spout reposition |
🔥 Step 3 — BOATS CHECK (1 minute)
Run के दौरान viewing window से देखो (proper PPE के साथ — UV-rated goggles):
- Dark या cold boat? → Crack confirmed → Boat changeover plan करो
- Boats में glow uneven? → Copper contact oxidation → अगले stop में sandpaper + graphite tape
- Thyristor controller current 500A से कम? → Setpoint check, power controller पर LED status देखो
- एक end glowing, दूसरा dim? → Clamp pressure uneven → Evenly tighten करो
📡 Step 4 — INLINE OD SENSOR CHECK
Sensor ख़ुद problem का source हो सकता है:
- Mode Manual या Standby में? → AUTO mode पर डालो (lunch break के बाद operator सबसे ज़्यादा यही miss करता है)
- Wire feed पहले से 100%? → System starve हो रहा → Line speed temporarily कम करो
- Sensor window गंदा? → IPA + lint-free cloth से gently wipe (सिर्फ़ machine stop में)
- Inline reading vs offline mismatch? → Densitometer reference से recalibrate
✅ Step 5 — VERIFY
Full speed पर तुरंत वापस मत जाओ। ऐसे verify करो:
- 200 m/min पर चलाओ (safe verification speed)
- 50 metres के बाद offline sample लो
- Densitometer पर Left, Centre, Right OD measure करो
- तीनों target के ±0.1 में? → Speed 50 m/min steps में बढ़ाओ
- अभी भी low? → Step 2 पर वापस जाओ (कुछ छूट गया)
📊 Quick Reference — Top 5 कारण Ranked
| Rank | कारण | Frequency | पहली Action |
|---|---|---|---|
| #1 | Drive wheel groove घिसा | ~35% | 2nd groove पर turn |
| #2 | Spout block / damaged | ~25% | निकालो और साफ करो |
| #3 | Sensor Manual mode में फँसा | ~15% | AUTO पर switch |
| #4 | Boat crack / cold spot | ~12% | Changeover plan |
| #5 | Wire spool ख़त्म | ~8% | नया spool |
🛡️ Prevention — Low OD आने से पहले रोको
- Monthly PM: Drive wheel अगले groove पर turn, घिसे spouts बदलो, spring tension check
- Weekly PM: Copper contacts साफ, fresh graphite tape लगाओ
- Per shift: Changeover में sensor window wipe
- Spare stock: हमेशा 10–20 ceramic boats, springs, spouts ready रखो
- Operator training: Slow shifts में हर operator से 5-step plan practise कराओ
📥 मुफ़्त Downloads — Shop Floor पर ले जाओ
दो professionally designed PDFs जो plant में तुरंत इस्तेमाल हो सकते हैं। Print करो, laminate करो, और real defects में use करो: