
📐 Wrinkle & Crease Defect — How Walking the Line Saves ₹8 Lakh/Month
Night shift, 2 AM. Met Slitter-1 is running 12-micron metallised PET. Every roll coming off the rewinder shows the same vertical wrinkles in a tin-canning pattern. The supervisor adjusts tension three times — no change. Two rolls go to B-Grade. By morning, the blame sequence has begun: film supplier, anti-static bar, nip pressure. Four weeks and ₹8 lakh later, the problem is still there. The real cause? A worn bearing on idler #6, five stations upstream of where anyone was looking.
This blog teaches the one method that finds wrinkle sources in 5 minutes — walking the line — and the critical distinction between a wrinkle (fixable) and a crease (permanent). Plus a free Action Card, Investigation Format, and interactive pattern-match tool. If you run a metalliser or slitter, this is the ₹6,500 shortcut that could save your next ₹8 lakh.
🔑 Wrinkle vs Crease — The 2-Second Shop Floor Test
When you spot a fold on the slitter, perform this test immediately: stretch the film flat by hand. If the fold disappears, it is a wrinkle. If the fold remains visible, it is a crease.
| Defect | What You Observe | Test Result | Can You Save It? |
|---|---|---|---|
| Wrinkle | Temporary fold that appears and disappears during the run | Disappears when stretched | Yes — fix the source and re-run |
| Crease | Permanent line pressed in by a nip or lay-on roller | Remains visible when stretched | No — downgrade to B-Grade or scrap |

The golden rule: every crease began as a wrinkle somewhere upstream. If you eliminate wrinkles at the source, creases never form. Crease repair does not exist as a process — only wrinkle prevention works. This is why the detection method in this blog focuses entirely on finding and fixing wrinkles before they become creases.
⚠️ Why This Defect Is So Expensive
- Customer laminators stop running: creased metallised film breaks on their production line, and the entire consignment gets rejected
- B-Grade penalty of 30-40%: even visible wrinkles that never became creases still downgrade the roll, reducing realised price significantly
- Rework is physically impossible: the aluminium coating and base film are permanently damaged — unlike OD problems, you cannot reprocess
- Reputation damage spreads: one customer complaint about wrinkles becomes a narrative that affects future orders from the same account
- Downstream slitter damage: creased web causes blade chatter, uneven winding tension, and telescoping on the output roll
🎯 The 4-Step Walk-the-Line Method
When you see a wrinkle, follow this exact sequence. Tension adjustment is the last step, not the first — for reasons the method makes clear.
| Step | Action | Time | Why This Order |
|---|---|---|---|
| 1. Identify the Pattern | Is the fold direction machine-direction (vertical), cross-direction (horizontal), or diagonal? Use the 5-pattern guide below | 2 min | Pattern direction reveals the type of geometry problem |
| 2. Walk Upstream with a Lamp | Start at the rewinder. Shine a portable lamp at low angle across the web. Walk backwards station by station until you reach the first roller where the wrinkle or its shadow is still visible | 3-5 min | Experience shows 90% of wrinkles originate at one specific component |
| 3. Inspect That Component | Check for roller deflection, bearing play, alignment issues, surface deposits, or rubber damage. The first defect you find is typically your root cause | 3 min | Targeted inspection beats random parameter adjustment |
| 4. Fix and Verify | Correct the defect, run 50 metres at slow speed, and inspect the output roll. If the wrinkle is gone, resume production. If not, return to Step 2 | 5 min | Never declare the problem fixed without verification |

💡 Pro tip — Shadows before wrinkles
Shine the lamp at a low angle across the web. Experienced troubleshooters spot forming wrinkles 3-4 rollers upstream of where they actually fold over — the wrinkle exists first as a shadow in the web. Catching it at the shadow stage saves the entire roll.
🔍 The 5 Wrinkle Patterns — Each Pattern Tells a Different Story
Every wrinkle falls into one of five patterns. Recognising the pattern on sight is the most valuable diagnostic skill an operator can develop, because each pattern points to a specific category of cause.
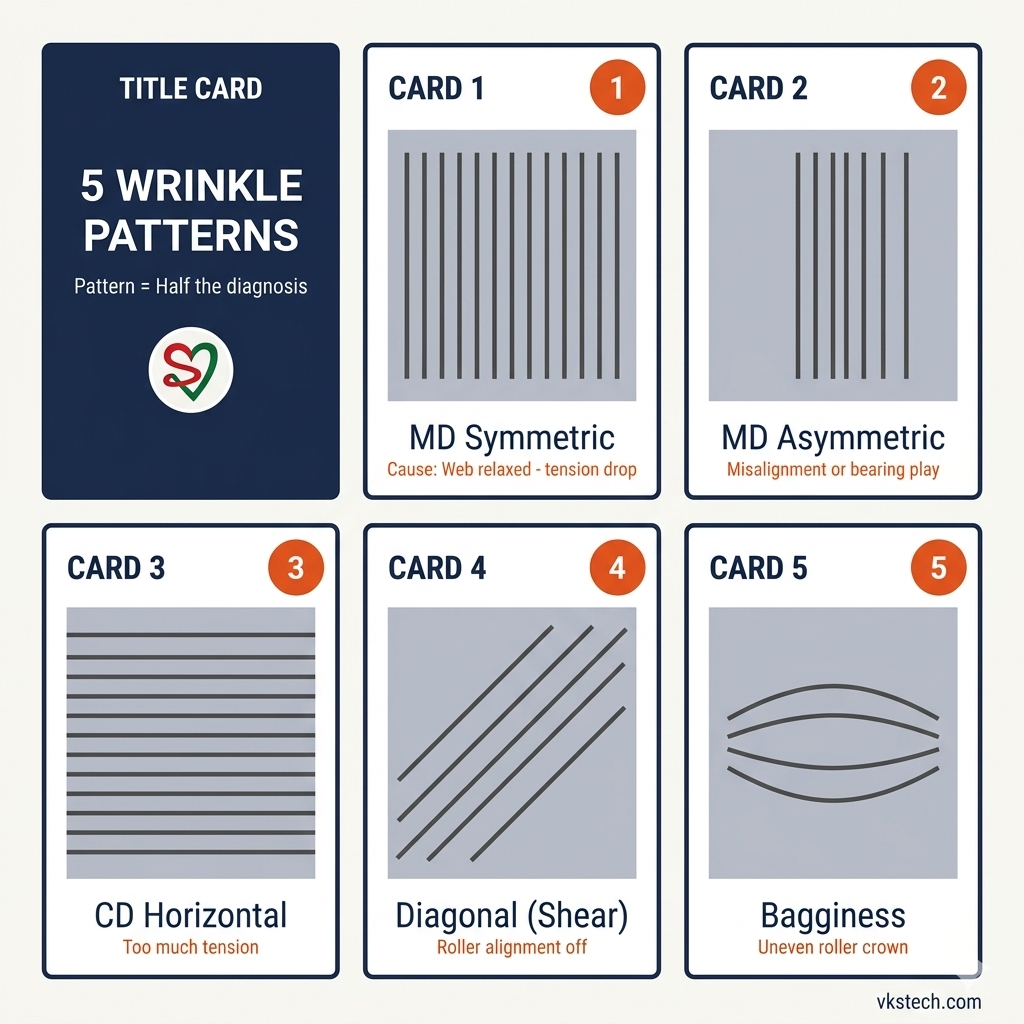
▌▌▌ Pattern 1 — Tin-Canning (MD Symmetric)
Parallel vertical lines at uniform spacing, resembling the ribs of a tin roof
➤ Cause: The web has expanded from tension drop, heat, or humidity and has excess width with nowhere to go.
➤ Fix: Keep tension constant across zones. Install a bowed spreader roller or a larger-diameter idler with shallow grooves.
▌ ▌ Pattern 2 — Single Bulge (MD Asymmetric)
Multiple vertical wrinkles collecting into one prominent bulge or crease somewhere across the width
➤ Cause: Gauge band or baggy area in the unwind roll, spreader misalignment, or uneven tension distribution across the web width.
➤ Fix: Check the unwind roll with a micrometer. If gauge variation exceeds ±3%, raise an NCR with the supplier. Verify spreader alignment.
═══ Pattern 3 — Cross-Direction Lines
Horizontal stripes running perpendicular to web travel
➤ Cause: Heated roller running too hot, excess nip pressure, or tension pulses from a worn gearbox or drive belt.
➤ Fix: Reduce heated roller temperature by 5-10°C. Verify nip pressure against specification. Inspect the drive train for worn bearings.
↗↗↗ Pattern 4 — Bow Wrinkle (Diagonal Symmetric)
Chevron or arrowhead pattern pointing downstream, starting from both edges and fading toward the centre
➤ Cause: A smile-shaped roller — curved from excessive deflection, typically because its diameter is too small for the web width and tension load.
➤ Fix: Replace with a larger-diameter roller. If it is a nip roll, verify the crown matches the current tension load.
↗ Pattern 5 — One-Sided Diagonal (Diagonal Asymmetric)
Diagonal fold from one edge only, often accompanied by web tracking toward that side
➤ Cause: Misaligned roller with one end higher or rotated, a worn bearing on one side only, or a tilted machine frame.
➤ Fix: Use a laser alignment tool on all rollers upstream from the defect point. Replace worn bearings. Verify frame leveling.
🔬 Pattern Match Tool — 4 Questions, Top 3 Causes
When a wrinkle appears on the floor, answer these four quick questions. The tool below returns your top three most likely causes with specific fix guidance. Everything runs locally in your browser — no data is uploaded anywhere:
🏭 Real Shop Floor Story — The Bearing Check That Saved ₹8 Lakh
Night shift, 2 AM. Met Slitter-1. Every 12-micron metallised PET roll coming off the machine showed vertical wrinkles in the classic tin-canning pattern. The operator called the shift supervisor.
"Sir — tension up or down?"
The supervisor adjusted tension three times. No improvement. Two more rolls went to B-Grade. By the morning meeting, the blame sequence had already begun.
Week 1: The film supplier was blamed — certificates came back showing the jumbos were within specification.
Week 2: The anti-static bar was serviced — the wrinkles continued.
Week 3: Nip pressure was reduced — the web began to slip, and the wrinkles worsened.
Week 4: Monthly loss reached ₹8 lakh in B-Grade downgrades and wasted film.
Then a senior technical consultant arrived for a routine audit and was told about the problem. His approach was different.
"Don't touch anything. Walk with me."
He started at the rewinder and walked backwards along the web path, holding a portable lamp at a low angle. At idler roller number six — five stations upstream of the rewinder — he stopped.
"Look at the shadow here. The wrinkle is forming at this roller."
Idler number six was pulled during the weekend shutdown. The bearing on the operator side had 2mm of radial play. Under load, the roller was running slightly off-axis, forming a subtle smile shape that the web had to conform to. It was not bad enough to create noise. Not enough to show up on a routine PM check. But it was more than enough to create perfect conditions for MD wrinkle formation on every pass.
Total fix cost: ₹3,800 for a new bearing plus 4 hours of labour, totalling ₹6,500. Monthly saving: ₹8 lakh. Payback: 4 hours. The wrinkles disappeared completely in the very first shift after the bearing change. That engineer now runs a monthly laser alignment check on all slitter rollers — a 90-minute job that prevents months of downgrades.
💡 The Lesson — Alignment-First, Not Tension-First. Every time tension is adjusted without first walking the line, the symptom gets treated while the root cause hides. Plants that eliminate wrinkle problems permanently are the plants that stop at the first roller where a shadow appears — not the last one where the fold becomes visible.
🛡️ Prevention — 8 Routines That Stop Wrinkles Before They Start
- Weekly laser alignment check on every idler, nip roll, and spreader. Thirty minutes a week against ₹8 lakh a month in downgrades is the right trade
- Bearing play check every PM cycle. Push each roller laterally by hand. Any perceivable play means the bearing needs replacement — no exceptions
- Taper tension enabled at the rewinder. As diameter grows, tension must reduce proportionally. Constant tension from core to full roll guarantees wrinkles near the end
- IPA wipe on all idlers every shift. Surface deposits create local tension differences that become MD wrinkles within a few jumbos
- Foam end caps during every roll handling operation. A single forklift knock creates edge damage that propagates into CD wrinkles across the entire roll
- Storage only in vertical orientation, never stacked horizontally. The weight of upper rolls creates permanent pressure creases on lower rolls
- Heated roller temperature changes in 2°C steps. Sudden temperature swings cause the film to expand or contract faster than the web tension can accommodate
- Strict FIFO with a 48-hour maximum handling window. Rolls sitting longer develop internal stress patterns that emerge as wrinkles during processing
📥 Free Downloads — Take These to the Slitter
Two professionally designed PDFs ready for immediate plant use. Print, laminate, and use during every wrinkle investigation:
📐 Wrinkle और Crease — 4-Step Walk जो Tension Adjustment से नहीं दिखती बात पकड़ती है
Slitter पर wrinkle दिखी? हाथ tension पर मत लगाओ। पहले lamp उठाओ, फिर upstream चलो। Wrinkles और creases को 90% लोग ग़लत तरीके से diagnose करते हैं — और हर ग़लत diagnosis लाखों खराब करती है।
ये blog आपको shop floor पर real investigation का तरीक़ा सिखाएगी। Wrinkle और crease same नहीं हैं। दो अलग defects हैं, दो अलग fixes हैं। पहले फ़र्क़ समझो, फिर fix करो।
🔑 Wrinkle vs Crease — 2-Second Shop Floor Test
Slitter पर कोई fold दिखे, तुरंत ये test करो: film को हाथ से flat खींचो। Fold गायब हो गई? Wrinkle है। Fold रह गई? Crease है।

| Defect | क्या दिखता है | Test Result | Bach सकती है? |
|---|---|---|---|
| Wrinkle | Temporary fold — run में आती-जाती रहती है | Stretch करने पर गायब | हाँ — source fix करो, re-run |
| Crease | Permanent line — nip या lay-on roller ने दबा दी | Stretch करने पर भी दिखती है | नहीं — B-Grade या scrap |
Golden rule याद रखो: हर crease पहले wrinkle थी। अगर upstream wrinkle रोक लोगे, crease कभी नहीं बनेगी। Crease repair exist नहीं करता — सिर्फ़ wrinkle prevention काम करता है।
⚠️ ये Defect इतनी महँगी क्यों है
- Customer का laminator रुक जाता है — creased film पे web break → पूरा batch वापस आता है
- B-Grade में 30-40% price cut — visible wrinkles जो crease नहीं बनी, वो भी downgrade
- Rework possible ही नहीं — aluminium coating और base film physically damage हो गई
- Customer reputation ख़त्म — "इनकी film में wrinkles आते हैं" narrative फैल जाती है
- Slitter पर downstream damage — creased web blade chatter, uneven winding, telescoping बनाती है
🎯 4-Step Walk the Line Method
Wrinkle दिखी? ये exact sequence follow करो। Tension adjustment सबसे last step है, पहला नहीं।
| Step | Action | Time | क्यों |
|---|---|---|---|
| 1. Pattern पहचानो | क्या direction है? MD (vertical) / CD (horizontal) / Diagonal? 5 patterns guide use करो | 2 min | Pattern = आधा diagnosis |
| 2. Lamp उठाओ, Upstream चलो | Rewinder से शुरू करो। Portable lamp low angle पे डालो। पीछे चलते जाओ जब तक पहला roller मिले जहाँ wrinkle shadow दिख रही है | 3-5 min | 90% wrinkles एक ही roller से आती हैं |
| 3. उस Component को Check करो | Bearing play? Alignment? Roller deflection? गंदे deposits? Rubber damage? जो मिलता है, वही cause है | 3 min | Targeted fix > random tension adjustment |
| 4. Fix + Verify | Component fix करो। Slow speed पे 50m चलाओ। Output roll inspect करो। Wrinkle नहीं? Resume। Wrinkle है? Step 2 वापस | 5 min | Verification के बिना "fixed" मत बोलना |

💡 Pro Tip — "Shadow पहले, Wrinkle बाद में"
Web पे lamp low angle से डालो। Experienced operators wrinkle को 3-4 rollers upstream से पकड़ लेते हैं — जब वो सिर्फ़ shadow होती है, visible fold नहीं। जल्दी पकड़ने से पूरी roll बचती है।
🔍 5 Wrinkle Patterns — हर एक की अलग कहानी
हर wrinkle इन 5 patterns में से एक होती है। Pattern देखते ही cause समझ आ जाता है — ये operator का सबसे बड़ा skill है:

▌▌▌ Pattern 1 — खड़ी झुर्रियाँ (MD Symmetric / Tin-Canning)
Equal spacing में vertical parallel lines — tin की छत जैसी
➤ Cause: Web फूल गई — tension drop, heat, या humidity से। Extra width है, कहीं जाने की जगह नहीं।
➤ Fix: Zones में tension constant रखो। Bowed spreader roller लगाओ, या बड़ी diameter वाला idler with shallow grooves।
▌ ▌ Pattern 2 — इकट्ठा Bulge (MD Asymmetric)
खड़ी wrinkles एक जगह इकट्ठी हो कर bulge या crease बन जाती हैं
➤ Cause: Unwind roll में gauge band या baggy area। Spreader misalign। Width में tension uneven।
➤ Fix: Unwind roll micrometer से check करो। Gauge variation >±3% है? Supplier पे NCR उठाओ। Spreader alignment verify करो।
═══ Pattern 3 — पड़ी झुर्रियाँ (CD — Cross-Direction)
Machine direction के perpendicular — horizontal stripes
➤ Cause: Heated roller ज़्यादा गर्म। Nip pressure ज़्यादा। Worn gearbox या belt से tension में pulse।
➤ Fix: Heated roller temp 5-10°C कम करो। Nip pressure spec के against check। Drive train में worn bearings देखो।
↗↗↗ Pattern 4 — धनुष Pattern (Diagonal Symmetric / Bow)
Chevron या arrowhead — दोनों edges से शुरू हो कर center में मिलता है
➤ Cause: "Smile-shaped" roller — curved है। Deflection ज़्यादा क्योंकि diameter web width के हिसाब से छोटा है।
➤ Fix: बड़ी diameter वाला roller लगाओ। Nip roll है तो crown tension load से match करो।
↗ Pattern 5 — एक तरफ़ से (Diagonal Asymmetric)
सिर्फ़ एक edge से diagonal — web उस तरफ़ track कर रही है
➤ Cause: Roller misaligned — एक end ऊँची या rotated। एक side की bearing worn। Machine frame tilted।
➤ Fix: उस point से upstream सारे rollers laser align करो। Worn bearings replace। Frame leveling check।
🔬 Pattern Match Tool — 4 Questions, Top 3 Causes
Shop floor पे wrinkle दिखे? नीचे 4 simple questions answer करो। Tool top 3 most likely causes बताएगा with fix guidance। Browser में चलता है — कुछ upload नहीं होता:
🏭 असली Shop Floor कहानी — ₹8 लाख Save करने वाली Bearing Check
Night shift, 2 बजे। Met Slitter-1. हर 12-micron metallised PET roll पे खड़ी झुर्रियाँ (tin-canning)। Operator ने supervisor को बुलाया।
"Sir, फिर से wrinkles आ रही हैं। Tension का क्या करूँ?"
Supervisor ने tension 3 बार adjust की। कोई improvement नहीं। दो और rolls B-Grade। Morning meeting तक blame sequence चल पड़ा।
Week 1: Film supplier को blame — certificates आए, jumbos spec में थे।
Week 2: Anti-static bar service — wrinkles जारी।
Week 3: Nip pressure कम — web slip कर गई, wrinkles और बढ़ीं।
Week 4: Monthly loss: ₹8 लाख B-Grade downgrades + wasted film।
फिर एक senior technical consultant routine audit पे आया। उनका तरीक़ा अलग था।
"कुछ मत बदलो अभी। सिर्फ़ मेरे साथ चलो।"
Rewinder से शुरू किया। Portable lamp low angle पे डालते हुए पीछे चले। Idler roller #6 पर — rewinder से 5 stations upstream — वो रुके।
"यहाँ shadow देखो। Web जब इस roller को cross करती है, shadow का angle बदल जाता है। Wrinkle यहीं बन रही है।"
Weekend shutdown में idler #6 pull किया। Operator side की bearing में 2mm radial play थी। Load पे roller slightly off-axis घूम रहा था। "Smile" shape बन रहा था जिस पे web conform करती थी। इतना subtle कि noise नहीं करता। Routine PM में नहीं पकड़ा गया। लेकिन MD wrinkle formation के लिए perfect conditions।
Fix cost: ₹3,800 नया bearing + 4 घंटे labour = ₹6,500. Monthly saving: ₹8 लाख। Payback: 4 घंटे। Bearing change के बाद पहली shift में ही wrinkles गायब। अब वो engineer monthly laser alignment check करता है — 90 मिनट का काम जो महीनों की downgrades रोकता है।
💡 सीख — Tension-First नहीं, Alignment-First। जब भी tension adjust करते हो बिना line walk किए, आप symptom treat कर रहे हो। Root cause छुपी रहती है। जो plants wrinkle problem हमेशा के लिए solve करते हैं, वो पहले roller पे रुकते हैं जहाँ shadow दिखती है — नहीं जहाँ fold visible होती है।
🛡️ Prevention — 8 आदतें जो Wrinkles रोकती हैं
- Weekly laser alignment check — सारे idlers, nip rolls, spreaders पे। 30 min weekly vs ₹8 लाख monthly downgrades
- हर PM cycle में bearing play check — roller को हाथ से laterally push करो। थोड़ा भी play = bearing replace। Exception नहीं
- Taper tension enabled at rewinder — diameter बढ़े, tension proportionally कम। Constant tension = full roll पे wrinkle पक्की
- हर shift IPA wipe सारे idlers — deposits local tension difference बनाते हैं → MD wrinkles
- Foam end caps with every roll handling — एक forklift knock edge damage बनाता है जो पूरी roll में propagate होती है
- Storage सिर्फ़ vertical, stacked नहीं — ऊपर के rolls नीचे वाले पे pressure crease बनाते हैं
- Heated roller temperature 2°C steps में ramp — sudden change = wrinkle। Film expand/contract होती है
- 48-घंटे roll handling window, strict FIFO — पुराने rolls में internal stress patterns develop होते हैं
📥 मुफ़्त Downloads — Slitter पे ले जाओ
दो professionally designed PDFs — तुरंत use के लिए। Print करो, laminate करो, defect के वक़्त use करो: